Background
I have not been successful to get past the Edison Image build process until yesterday!
Previously I have tried it on a Debian machine and it was taking painfully long with
all sort of hangs and crashes during the build. I recently came across a foil set by one
by one of my friends which had a pointer to a build on a virtual machine.
Here is what I followed but I wanted to list the BKM so that other people don’t
struggle with silly problems that I faced and these can rip your morale into pieces.
https://github.com/drejkim/edison-imaging-vm
Virtualization
The beauty of this method is that it used Virtualization – Not just because
Virtualization is cool, the features that come with Virtualization are pretty cool!
I will get to that in a while – But here is a BKM that I followed and got it to work
on my Windows7 PC
Software Setup
I am on a Windows 7 PC with Cygwin installed on the same(git comes along with it)
a. Enable Virtualization/VTd in BIOS – Without this, I could only select 32-bit VMs.
b. Install Oracle VirtualBox https://www.virtualbox.org/wiki/Downloads
Download the 64-bit version depending on whether you have a 64-bit machine.
c. Vagrant – https://docs.vagrantup.com/v2/installation/index.html
Just install the Windows installable – don’t have to worry about Ruby gems etc.
d. Use Cygwin to cd into a local directory – C:/ would be mapped to /cygdrive/c/
e. Git clone the following repo which has the configuration file for Vagrant i.e
Vagrantfile and the provisions.sh file as well.
https://github.com/drejkim/edison-imaging-vm
f) Start Vagrant virtual machine. Cd into the directory and start off with
> /cygdrive/c/HashiCorp/Vagrant/bin/vagrant.exe up
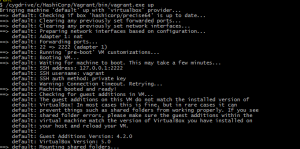
g) Now invoke the VirtualBox and you will see a virtual machine already running.

Get into the virtual machine and with following credentials
username: vagrant
password: vagrant
h) Use the shared drive to copy over the edison-src.tgz for Edison image build.
(Refer http://www.intel.com/support/edison/sb/CS-035278.htm) for where to download the source
files from.
i) Once you download the files, use command on the command line on the shell through Virtual box
> tar xvf edison-src-<date>.tgz -C ~
NOTE: Do not change any directories and extract the source at /home/vagrant/ itself.
j) Now you can use the following commands to build the image
sudo apt-get install build-essential git diffstat gawk chrpath texinfo libtool gcc-multilib
> cd edison-src/
> mkdir bitbake_download_dir
> mkdir bitbake_sstate_dir
> ./meta-intel-edison/setup.sh –dl_dir=/home/vagrant/edison-src/bitbake_download_dir –sstate_dir=/home/vagrant/edison-src/bitbake_sstate_dir
> source poky/oe-init-build-env
> bitbake edison-image
Once build process is done, the image for edison is under `pwd`/out/linux/tmp/deploy/images
i) To get all the image files into a single directory. Delete the build directory in the edison-src directory
and create a softlink to the new directory – The Intel document uses edison-src/build as the directory
to fetch build images but looks like of late the images get built in the edison-src/out/linux64/build
directory.
ln -s edison-src/out/linux64 edison-src/build
./meta-intel-edison/utils/flash/postBuild.sh
The above script copies the relevant build files to edison-src/build/toFlash directory!!
FAQs
How long would it take? Around 4 to 5 hours.
Network connectivity required? Yes, please do not switch networks. Will the process hang?
Yes, sometimes, the build log would update the number of tasks that are already run and total number of
tasks that will be run. If the number of task doesn’t update for long, (like more than half hour?) then its probably hung.
At this point, don’t panic – just Control-C and rerun bitbake edison-image and it should continue from where it
ended last time (pretty cool eh!!)
What I liked about this VM method?
a) It only requires about 30G of space allocated to the VM. If you are building on a native installation, 80G of free
space is required for this compilation.
b) Almost no hassles and errors on environment issues
c) VM goodness – My PC ran out of battery while I had the build running but the PC shutdown after a “save”, when
I powered it up again, the build exactly ran from where it had stopped.
Comment/Send me an email if you have questions, more than glad to help! And oh yeas – please
Share/Like the blog if it did help you.
/G