The Pentagram of Venus

Azimuth

This image, made by Greg Egan, shows the orbit of Venus.

Look down on the plane of the Solar System from above the Earth. Track the Earth so it always appears directly below you, but don’t turn along with it. With the passage of each year, you will see the Sun go around the Earth. As the Sun goes around the Earth 8 times, Venus goes around the Sun 13 times, and traces out the pretty curve shown here.

It’s called the pentagram of Venus, because it has 5 ‘lobes’ where Venus makes its closest approach to Earth. At each closest approach, Venus move backwards compared to its usual motion across the sky: this is called retrograde motion.

Actually, what I just said is only approximately true. The Earth orbits the Sun once every

365.256

days. Venus orbits the Sun once every

224.701

days. So, Venus orbits…

View original post 763 more words

adb install over WiFi!

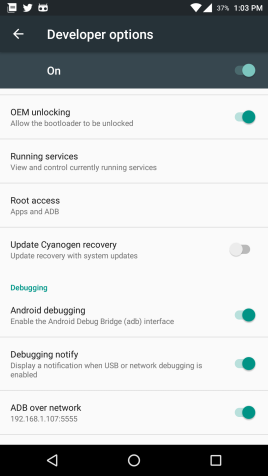
Quick tip for installing android apk files – On Developer options, enable adb debugging over network. You wouldn’t need to be rooted.

Screenshot_20160110-130303

Use the following simple commands for adb install over WiFi or through an USB connection. WiFi just needs to be on the same network and doesn’t have to be over a Hot Spot between your phone and system.

sudo adb devices

sudo adb connect 192.168.1.107

sudo adb install -r <path to the apk on your PC>

Using -r in the install command will over write any previous installation of the same apk.

Cheers!

DIY Weekend! Charlieplexing with LEDs

So around the corner was the Christmas eve coming off on a Friday and it called for another long lazy weekend. I came across this wonderful, wonderful DIY gem from one Mr. Alessandro Matera, called the KeyChainino. The keychainino is a very nice and simple DIY keychain piece but all the design thinking that Alessandro has put into this small thing, this makes for a really cool educational tool. Underneath the Keychainino is driven by an ATTiny84 micro-controller to drive a bunch of LEDs. So what’s special? I am amazed by the various different design hacks this product has. Here are some

  1. For starters, Its tiny and fits as a key chain!
  2. The design idea behind driving LEDs is called Charlieplexing where you can have minimal pins to drive a matrix of LEDs – Its magic! Conventionally to drive a 4×3 matrix of LEDs you’d need 7 pins(4+3), this technique uses just 4. The keychainino figures 30 LEDs driven by just 6 pins.
  3. It’s Arduino compatible – so quick and easy to program

And most importantly it can be DIY thingy – spend over a day and you can do it yourself. So I decided to spend a day trying my hands on implementing this.

I had a bunch of surface mount LEDs lying around and a zero PCB and an Arduino Mini Pro lying around. Some reading that I’d suggest you do.

  1. Soldering lessons from PACE – Believe you me, you will fall in love with soldering awesomeness
  2. Read about Charlieplexing here
  3. I used the Charlieplexing circuit from http://www.ominoushum.com/life/ – This makes for a nice matrix based layout – something that you can find it easy to solder on the zero PCB.
  4. Arduino and some code from Alessandro.

At the end of this I realized this can be a great exercise at soldering as well. I am also inspired now to learn KiCAD to make a home made DIY PCB fit all this. I will post my learning on this later in another post.

I failed at soldering the smaller LED pieces and ruined some connections initially. On the second try, I missed adding the resistors to the LEDs but again hacked the same layout – was a bit messy but worth the effort!

So here’s a DIY display from LEDs – Quick and dirty!

https://www.instagram.com/p/_0gwjZnKif/

https://www.instagram.com/p/_0hOxoHKja/

Happy Making!!
Ghanashyam

Timelapse with Intel Edison

# eddie-timelapse
[The following is pretty much the README of the git hub repository for the code of this project]

Description

This is a small weekend project that I worked on to create a time-lapse video using an off the shelf LogiTech webcam and an Intel Edison board. The Intel Edison platform can trigger camera captures at regular intervals using cron linux utility – Once there is a capture, a nodejs or python program calls Temboo middleware APIs to upload them to Drop box.

Here’s the link to the video that I could get this this. It is pretty rudimentary but you get to know what it fundamentally takes to get a time lapse video.  A lot of patience and perfection :^)

Setup Notes

For Temboo, you will need to install the temboo python or node js SDK on the Intel Edison.  SDK  Setup is pretty simple – Just download the SDK, and unzip it to a directory on the Intel Edison – You can download the SDK from the below links

nodejs - http://temboo.com/sdk/nodejs
python - http://temboo.com/sdk/python

Once the SDK is copied over, clone the https://github.com/ghanashyamprabhu/eddie-timelapse repository. From the repo, Either of the main.js or main.py can be used to trigger captures and calls to Temboo APIs to upload pictures to Dropbox.

3. Drop box and Temboo with OAuth

3.1 Create an App with Drop box

Go to https://www.dropbox.com/developers -> App Console -> Check Dropbox API app On creation of the app, it will show you the AppKey and AppSecret which you will need to note down so that you can use it in the main() function to authenticate connection to Dropbox through Temboo API calls.

3.2 Temboo

Follow the setup instructions to Authorize calls to Drop box via https://temboo.com/library/Library/Dropbox/OAuth/ . Once the InitializeOAuth and FinalizeOAuth Choreos are completed, you will see the ‘callbackID’ and ‘OAuth token secret’ that you can use in the main() function for authentication.

4. Cron Job

To set the interval, we will use cron job. On Intel Edison platform, you can use a utility called cronie to do trigger execution of scripts at a regular interval.

4.1 OPKG Install Cronie

Setup opkg repo – On Edison console, execute the following.

> echo "src all http://repo.opkg.net/edison/repo/all" >> /etc/opkg/base-feeds.conf
> echo "src edison http://repo.opkg.net/edison/repo/edison" >> /etc/opkg/base-feeds.conf
> echo "src core2-32 http://repo.opkg.net/edison/repo/core2-32" >> /etc/opkg/base-feeds.conf
> opkg update
> opkg install cronie

4.2 Cronjob

Use the crontab to setup the job using the following command

> crontab -e

This will open up an editor (possibly via vi) to add in the statement to call the script
I used the following added

*/10 * * * * /usr/bin/python /home/root/sw/temboo/temboo_python_sdk/main.py'

For more information on the cron formatsi and examples, refer
https://wiki.archlinux.org/index.php/Cron#Examples

5. Creating the video

I used avconv to create the video from the images that were uploaded to Dropbox. One of the requirements would be to have a good numbering of the images while creating the image files. I used the time of the hour to create the images, but that wasn’t suiting avconv, so once I downloaded all the images, I ran the following command which will name the files in an incremental fashion, Run it in the directory where you have the files

> ls -ltr | awk 'BEGIN{a=0}{printf "mv %s eddie_%04d.jpg\n", $0, a; a++}' | bash

You can now use avconv linux utility to convert these images into an mp4video.

> avconv -y -r 20 -i eddie_%04d.jpg -r 20 -q:v 3 timelapse.mp4

/Ghanashyam

Yocto Linux Image build for Intel Edison – Simple and Easy

Background
I have not been successful to get past the Edison Image build process until yesterday!
Previously I have tried it on a Debian machine and it was taking painfully long with
all sort of hangs and crashes during the build. I recently came across a foil set by one
by one of my friends which had a pointer to a build on a virtual machine.

Here is what I followed but I wanted to list the BKM so that other people don’t
struggle with silly problems that I faced and these can rip your morale into pieces.
https://github.com/drejkim/edison-imaging-vm

Virtualization
The beauty of this method is that it used Virtualization – Not just because
Virtualization is cool, the features that come with Virtualization are pretty cool!
I will get to that in a while – But here is a BKM that I followed and got it to work
on my Windows7 PC

Software Setup
I am on a Windows 7 PC with Cygwin installed on the same(git comes along with it)
a. Enable Virtualization/VTd in BIOS – Without this, I could only select 32-bit VMs.

b. Install Oracle VirtualBox https://www.virtualbox.org/wiki/Downloads

Download the 64-bit version depending on whether you have a 64-bit machine.

c. Vagrant – https://docs.vagrantup.com/v2/installation/index.html
Just install the Windows installable – don’t have to worry about Ruby gems etc.

d. Use Cygwin to cd into a local directory – C:/ would be mapped to /cygdrive/c/

e. Git clone the following repo which has the configuration file for Vagrant i.e
Vagrantfile and the provisions.sh file as well.

https://github.com/drejkim/edison-imaging-vm

f) Start Vagrant virtual machine. Cd into the directory and start off with

> /cygdrive/c/HashiCorp/Vagrant/bin/vagrant.exe up
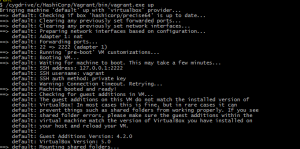
pastedImage_3

g) Now invoke the VirtualBox and you will see a virtual machine already running.

pastedImage_5

Get into the virtual machine and with following credentials

username: vagrant
password: vagrant

h) Use the shared drive to copy over the edison-src.tgz for Edison image build.
(Refer http://www.intel.com/support/edison/sb/CS-035278.htm) for where to download the source
files from.

i) Once you download the files, use command on the command line on the shell through Virtual box

> tar xvf edison-src-<date>.tgz -C ~

NOTE: Do not change any directories and extract the source at /home/vagrant/ itself.

j) Now you can use the following commands to build the image

sudo apt-get install build-essential git diffstat gawk chrpath texinfo libtool gcc-multilib
> cd edison-src/
> mkdir bitbake_download_dir
> mkdir bitbake_sstate_dir
> ./meta-intel-edison/setup.sh –dl_dir=/home/vagrant/edison-src/bitbake_download_dir –sstate_dir=/home/vagrant/edison-src/bitbake_sstate_dir
> source poky/oe-init-build-env
> bitbake edison-image

Once build process is done, the image for edison is under `pwd`/out/linux/tmp/deploy/images

i) To get all the image files into a single directory. Delete the build directory in the edison-src directory
and create a softlink to the new directory – The Intel document uses edison-src/build as the directory
to fetch build images but looks like of late the images get built in the edison-src/out/linux64/build
directory.

ln -s edison-src/out/linux64 edison-src/build
./meta-intel-edison/utils/flash/postBuild.sh

The above script copies the relevant build files to edison-src/build/toFlash directory!!

FAQs
How long would it take? Around 4 to 5 hours.

Network connectivity required? Yes, please do not switch networks. Will the process hang?
Yes, sometimes, the build log would update the number of tasks that are already run and total number of
tasks that will be run. If the number of task doesn’t update for long, (like more than half hour?) then its probably hung.
At this point, don’t panic – just Control-C and rerun bitbake edison-image and it should continue from where it
ended last time (pretty cool eh!!)

What I liked about this VM method?

a) It only requires about 30G of space allocated to the VM. If you are building on a native installation, 80G of free
space is required for this compilation.
b) Almost no hassles and errors on environment issues
c) VM goodness – My PC ran out of battery while I had the build running but the PC shutdown after a “save”, when
I powered it up again, the build exactly ran from where it had stopped.

Comment/Send me an email if you have questions, more than glad to help! And oh yeas – please
Share/Like the blog if it did help you.
/G

Edison Set up Notes *Scratch*

This is sort of my scratch buffer for Edison setup notes which I can look up / or someone interested can look up anytime.

Enabling Audio on Edison – wonderful work by Alex T, an Engineer at Intel

http://alextgalileo.altervista.org/blog/lets-make-noise-play-audio-edison/

Robotics and Nodejs

Installing johnny-five (Robotics interfaces, serial communications …

> npm install johnny-five

Installing edison-io for use with johnny-five

> npm install edison-io

Installing ncurses and vim –

ncurses

> wget http://ftp.gnu.org/pub/gnu/ncurses/ncurses-5.7.tar.gz
> tar -xvzf ncurses-5.7.tar.gz
> cd ncurses-5.7
> ./configure –prefix=/usr
make
make install

Vim

> git clone https://github.com/b4winckler/vim.git
> cd vim> ./configure –with-features=huge
> make> make install

Installing git and other utilities

Add the following /etc/opkg/base-feeds.conf

src all http://iotdk.intel.com/repos/1.1/iotdk/all
src x86 http://iotdk.intel.com/repos/1.1/iotdk/x86
src i586 http://iotdk.intel.com/repos/1.1/iotdk/i586

then run

> opkg update > opkg install git

With Edison you might just get root partition filled up – so prepare to redirect user installs to sdard

Connmanctl Errors
Sometimes you might get an error when you run connmanctl D-bus not built with r-dynamic failing to get you to the connmanctl prompt. One of the solution is to just restart the daemon using systemctl

> systemctl enable connmanctl
> systemctl start connmanctl

Intel Maker IoT Roadshow 2014

Had this wonderful opportunity to mentor/volunteer at the Intel IoT Hackathon today!

Over a hundred Makers turned up and was really interesting to interact to get new ideas and what’s possible with the Internet of Things. Ideas like activity tracking for people who need care, smoke detection(Pun, the hall was all smoky for a while), tracking Rhinos, smart parking and what not!

And of course were three 3D printer demos – (see my twitter stream for photos) – two of them were very impressive!

a) CreatorBot’s low cost 3D printer for Rs. 20000 is sort of a hobby printer with innovation on the axis controls and open sourcing the software and the frame design! you can hack it yourself!

b) “Bramha 3D” printer – entirely indigenous design of high precision 3D printer from Bramha (I liked the name for this, literally implies Creator in Hindu mythology) and made completely from scratch in India – A true “Make in India” Project.

Envious of these participants for the sort of “Give away” devices they got.

First 100 participants got

a) Intel Galileo Gen 2 board
b) Intel Edison Board + Arduino Breakout Kit
c) Grove Sensor Kit (Sound, Temperature, Light, LCD, Pot, LED)
d) On demand sensors – accelerometer sensor, pressure sensors, gyros, LiPo batteries, Arduino shields and what not!

One guy turned up at 5AM in the morning and got a Basis Watch! Many guys got give-aways and cash for most active twitter users tweeting on #Intel #Maker stuff, selfies and stuff!

I’ve caught some of the glimpses from the event into this  album!

/Ghanashyam

[experience dated Nov2014]